Showing posts with label brining. Show all posts

Sunday, August 11, 2013

Hot (Pepper) Mess

Porch peppers beckon, even when you're not feeling well. When they're ripe, they're ripe and you gotta use them or they'll rot. So this weekend was time to make hot pepper relish. Only the red hot peppers were ready; in a week or so, the scotch bonnets will be ready. Those are a whole nother level of hot. I didn't use gloves this time and my hands are burning right now. I can't neglect to use them for the scotch bonnets.

I scavenged all of the old jars that people returned to me after our wedding (jars of hot pepper relish were the wedding favors), washed them in steaming hot water and got started. I rarely write down my relish recipes, but this time I did.


Hot Pepper Relish

One dozen hot red peppers
2 green bell peppers
1 red bell pepper
1 yellow bell pepper
1 large white onion
6 tomatillos
1 tbsp kosher or canning salt
3/4 cup sugar
1 1/4 cup cider vinegar
large saucepan
hot boiling water

Carefully handle the red peppers to cut off the stems and de-seed them.


Chop the vegetables in manageable pieces and in thirds, distribute the veggies & peppers into the food processor. Process until finely chopped. Place in a large saucepot. Sprinkle with 1 tbsp kosher/canning salt and then pour boiling water on top. Let sit for about 5 minutes.

After 5 minutes is up, drain the water from the peppers and place back on the stove. Pour in cider vinegar and sugar, and bring to a boil again. Turn the heat off after the boil begins, then spoon the finished relish into jars and quickly secure the lids.

They should indicate that they're sealed if they pop within an hour or so. If they don't pop, you'll have to refrigerate them. They'll be ready to use in 2-3 weeks.

Sunday, July 28, 2013

Pickling Berries


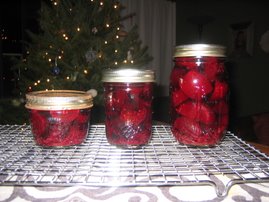
A few weeks ago, the wife of one of my softball teammates told me that she saw a recipe for pickled berries that she was interested in trying. She sent me the image of the recipe a few days later, and so when I saw these gorgeous red currants at the farmer's market this morning, I knew I had to try pickling them.
I found a Danish recipe, but it contained a preservative that I neither had nor wanted to use. And then I found an Alice Waters recipe adaptation which sounded more my style. I'm not sure yet what I'll do with them, but I have a few ideas. I could put them on a salad, serve them with some cheese and bread (Danish-style), but I'll most likely serve them alongside a venison and spaetzle.

Here's how I did it.

Pickled Red Currants
  
1 pint fresh red currants
1 cup champagne vinegar
1/8 cup sugar
10 each of juniper & allspice berries
1 stick of cinnamon
1 tsp pickling spices

Wash the jars out thoroughly with hot water, including the lids and place them near the stove. Wash your currants and place them carefully in the jars. Most of them will come off the stems, but leave some on the stems as they'll make a nice garnish in bunches. Chop your juniper and allspice berries on a cutting board. Add a bit of pickling spice to each jar. Bring the champagne vinegar, sugar, crushed berries, and cinnamon to a boil. (I added a dash of salt, too). Quickly pour the boiling liquid into the jars so that the berries are covered. Leave them to pickle for a few weeks before trying them in a dish.

Wednesday, May 9, 2012

Where's the Pickles?

There's an ultimate frisbee tournament coming up and I'm fresh out of pickles. If you've ever been to an ultimate frisbee tournament, you've probably seen the guys on the sidelines after a few games chugging pickle juice straight out of the jar. Pickle juice is widely believed by athletes (though not yet scientifically proven) to relieve muscle cramping. I like bringing my homemade pickles to the fields so that after they chug down some neon green Vlasic pickle juice, the guys can enjoy a fresh, tasty, wholesome pickle.

I picked up a few pounds of kirbys today at the Albany Food Co-op, and decided that they deserve not some pre-packaged, stale pickling spice, but a fresh, homemade pickling spice. So I made some. I adapted it from a blog called Girlichef. It's worth making your own pickling spice if only for the smell of the toasted coriander and mustard seeds crushed in a paper bag that will linger in your kitchen.

Juniper Pickling Spice

4 Tbs. whole black peppercorns
4 Tbs. mustard seeds
4 Tbs. coriander seeds
2 Tbs. crushed red chiles
2 Tbs. whole allspice berries
1 tsp turmeric
2 small cinnamon sticks, crushed or broken into pcs.
24 bay leaves, crumbled
2 Tbs. juniper berries
1 Tbs. ground ginger

Lightly toast the first three ingredients in a small dry pan, slide them into a paper sack (like a brown lunch bag), and then roll over them with a rolling pin a few times. Combine cracked spices with remaining ingredients, mixing well. Store in a tightly sealed plastic container or glass jar. Then, make yourself some healing pickles. Best Dill Pickle Recipe as of May 2012 You'll need 4 or more pounds of kirbys; and at least four, if not six, canning jars. Make sure the jars and lids are squeaky clean. Some folks say you have to sterilize them, others take a short cut and put them in a dishwasher. I just do a very thorough wash with hot soapy water right before I begin the process. Soak whole kirbys in ice water for between 2-8 hours Make brine: 4 cups white vinegar 12 cups water 2/3 pickling salt 2 tbsp pickling spice 1 tsp turmeric 3 tbsp sugar Add to each jar: 2-4 cloves of garlic 2-4 sprigs of dill 1 tbsp of pickling spice 1/2 tsp turmeric While bringing the brine to a boil, cut the kirbys into spears. You don't want to do this beforehand because you want the pickles to stay crisp in the ice water til the very end. Pack the spears into the jars, and fill each jar to the top with the well-combined and boiling brine. Screw on the lids, and set onto tea towels until you hear the lids pop. Once they pop, the jars are sealed and can be stored at room temperature. If they don't pop, you need to refrigerate them and use them within a few weeks. Serve fresh from the fridge, or on ice from the jar on the frisbee field. : )

Monday, April 2, 2012

Preserving Lemons

A restaurant called Nomad on the Lower East Side serves the best couscous I've ever had. The secret? Little bits of preserved lemon. We ordered filet mignon brochettes (basically shish kebabs), served over this fabulous couscous. Meyer lemons were on sale at Fairway today, so I decided to try to make some myself. I have a lamb tagine planned in a few weeks, and I'd like to come close to making the best couscous we've ever had.

Moroccan Preserved Lemons

4 Meyer lemons, scrubbed very clean
1/2 cup kosher salt, more if needed
Extra fresh squeezed lemon juice, if needed
Sterilized quart canning jar

Place 2 tablespoons of salt in the bottom of a sterilized jar. One by one, prepare the lemons in the following way. Cut off any protruding stems from the lemons, and cut 1/4 inch off the tip of each lemon. Cut the lemons as if you were going to cut them in half lengthwize, starting from the tip, but do not cut all the way. Keep the lemon attached at the base. Make another cut in a similar manner, so now the lemon is quartered, but again, attached at the base. Pry the lemons open and generously sprinkle salt all over the insides and outsides of the lemons. Pack the lemons in the jar, squishing them down so that juice is extracted and the lemon juice rises to the top of the jar.

Fill up the jar with lemons, make sure the top is covered with lemon juice. Add more fresh squeezed lemon juice if necessary. Top with a couple tablespoons of salt. Seal the jar and let sit at room temperature for a couple days. Turn the jar upside down ocassionally. Put in refrigerator and let sit, again turning upside down ocassionally, for at least 3 weeks, until lemon rinds soften.To use, remove a lemon from the jar and rinse thoroughly in water to remove salt. Discard seeds before using. Discard the pulp before using, if desired. Store in refrigerator for up to 6 months.

Sunday, February 19, 2012

Pickled Red Onions

Soler's Pupusas food truck plates its pupusas with pickled red onions, jalapenos, and sour cream. They're so delicious that we had the proprietor Raphael Soler cater our wedding reception from his truck. Ever since we discovered his pupusas at the Red Hook ballfields, I've been saying that I wanted to make pickled red onions. Awesome in tacos, on arepas, and on top of burgers . . . it took me nearly two years to find the time to make them. A colleague turned me on to David Lebovitz's blog, where I found the best recipe for mint chocolate chip ice cream. I used his blog to find a simple recipe for pickled onions that I was finally able to make this afternoon.

Sunday, June 19, 2011

Bread & Butter

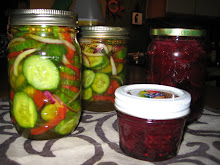
Would that making pickles were my bread & butter....particularly small batches like this. We're going camping for the July 4th weekend, so I'm getting some pickles ready for the burgers we'll grill over the fire. These are simple bread and butter pickles that take a few hours to assemble, and then about two weeks to sit.

Bread & Butter Pickles

6 cucumbers
1/4 sliced red bell pepper
1/2 onion, thinly sliced
1/2 cup salt
ice cubes
1 cup apple cider vinegar
2 cups water
3/4 cup sugar
1 tbsp pickling spices
3/4 tsp turmeric

Slice the cucumbers in oblong shapes, thick enough to stay crisp, but thin enough to place in a burger. Slice thinly 1/4 red bell pepper and 1/2 a white onion, then toss with 1/2 cup of salt. Cover the mixture with ice cubes and place in the fridge for at least three hours. The salt will make the vegetables emit water, so you don't need to put any water in with them. When you're ready to drain the pickles, add the cider vinegar, water, sugar, pickling spices, and turmeric into a saucepan and bring to a boil. Drain and lightly rinse the vegetables while you're waiting for the cider mixture to boil. Pack two mason jars full of the vegetables. When the cider mixture has come to a boil, pour the liquid over the vegetables so that they are fully immersed. Tighten the lids on the jars and let sit. After a day or so, you can move them to the fridge and keep until you're ready to use them. Enjoy!

Wednesday, September 29, 2010

Kicking Summer to the Curb


D and I recently hosted a "Kicking Summer to the Curb" party. It didn't work--we've still had too many hot and humid days here in New York. But the food was good, the company excellent.

Inspired by a wonderful dinner party we went to in the country last weekend, we made a slow-roasted pork shoulder, a Puerto Rican dish called "pernil." People raved about it, we loved it, and we had plenty of leftovers. Here's how we made it.

Pernil

1 pork shoulder (about 10 pounds), with the skin on
15 garlic cloves
2 tbsp dried oregano
2 tbsp kosher salt
2 tbsp coarsely ground black pepper
4 tbsp olive oil
1 tbsp white wine or champagne vinegar

The first thing you want to do is brine the pork shoulder about two days before you need to eat it. Place the raw pork shoulder in a pot, bag, or bin of water mixed with salt, pepper, sugar, and garlic. I recommend 4 tbsp of each. Submerge the shoulder in the water and keep for 12 to 24 hours in the fridge. This will make it really juicy.

Put the garlic, oregano, salt, and pepper in a mini chopper and chop chop until it forms a kind of paste. Remove from the chopper and place in a bowl. Stir in the olive oil and vinegar.

Take a knife and separate the skin and fat from the meat, leaving it attached so you can fold it back over the meat. Stab the meat with a sharp knife in 1/2 inch incisions, 1 inch deep so that the paste can penetrate the meat. Rub the garlic paste on the meat, and cover the coated meat with the skin again, securing with a skewer so that it doesn't pull away while cooking.

Cover the pork and let marinate for at least three to six hours. Depending on how long you let it sit, and how warm it is out, you might want to consider refrigerating it. Make sure you allow enough time to let it sit out at room temperature for 30 minutes before you roast it.

Preheat the oven to 350 and roast for about 10-12 hours. Some recipes will tell you to roast it at different temperatures for a shorter amount of time, but this length of time worked for us and we had nicely falling-off-the-bone pork, which is how I like it. If you want to get the skin crispy brown at the end, you can put it back in the oven and roast it for about 20-30 minutes at 450.

Let the meat rest on a cutting board for 20 minutes before slicing.

I used a recipe from epicurious, found here.

We served this on a big platter with pico de gallo, corn tortillas, rice, and beans, with a cilantro-lime-garlic viniagrette dressing to drizzle on top. I also froze about three sandwich bags full to make pork tacos at some point in the future. Tonite, we're having leftovers of this pork cooked with some BBQ sauce.

Wednesday, March 17, 2010

St. Pat's by Lamplight

After Christmas last year, we spent a week at our friends' country house in Pennsylvania. We usually go and stock up on buffalo meat from the buffalo farm about forty-five minutes away. A few times, we decided to stop at an antique store called The Glass Hat, where we found this amazing lamp. It took us a few months to decide whether we wanted to plunk down so much money for it, but even when money is tight, we never regret buying this oil lamp from the 1880s. We don't light it very often, but when we do, it makes any meal feel really special. We lit it for St. Patrick's Day this year.


Our meal only looks like it took a lot of work, but it didn't. The weekend before, we picked up a brined brisket from Trader Joe's (I meant to make my own this year, but . . . well, next year). I stuck that in a crock pot with some Guinness Beer, carrots, and onions this morning and let it cook for 8 hours. Then I boiled cabbage with caraway sees, heated up some aging carrot puree, and baked some sliced baby potatoes with olive oil, salt, pepper, and chopped rosemary.

The most unique thing about this year's meal was the whole wheat soda bread. I found a recipe that claimed to produce little confetti shamrocks when you sliced the bread. And it did! The sunflower seeds react somehow to the dough when it sits and then bakes in such a way that the seeds turn green! Totally fun. And it was very tasty. I will definitely make this bread again next year.

Shamrock Soda Bread

1 3/4 cups unbleached all-purpose flour
1 cup whole wheat flour or graham flour, plus more for shaping
3 tablespoons cold unsalted butter, cut into tablespoon-sized pieces
2 teaspoons baking soda
1 3/4 teaspoons salt
2 tablespoons granulated sugar
1/4 cup wheat bran
1/4 cup oat bran
1/4 cup untoasted wheat germ
2 tablespoons flaxseed
1/3 cup raw sunflower seeds
1 large egg
About 1 3/4 cups buttermilk

Adjust an oven rack to the center position and preheat the oven to 425°F. Coat a heavy baking sheet with vegetable cooking spray or line it with a silicone baking pan liner or aluminum foil.In a large bowl, stir together the all-purpose flour and whole wheat flour. Add the butter and work it into the dry ingredients with your fingertips until the fat particles are very fine. Stir in the baking soda, salt, sugar, wheat bran, oat bran, wheat germ, flaxseed, and sunflower seeds. Beat the egg lightly with a fork in a 2-cup glass measure. Add enough buttermilk to come to the 2-cup line and stir with the fork to combine well. Add the liquid to the dry ingredients and stir with a wooden spoon or rubber spatula until the dough gathers into a thick, wet-looking mass.

Sprinkle your work surface with whole wheat flour and scrape the dough onto it. Dust the dough with a bit more whole wheat flour. Pat the dough into a circular shape about 7 inches across and 2 inches high and transfer it to the prepared baking sheet. Don't be concerned about evenness—the loaf should look rustic. Make a cross-shaped indentation on top of the loaf going right to the edges. I use a plastic bench scraper and press it into the dough very gently; don't actually cut the dough. During baking the indentation expands, giving the top of the loaf an attractive pattern.

Bake the bread for about 40 minutes, until it is well browned and sounds hollow when rapped on the bottom. An instant-read thermometer inserted into the center of the loaf should register 195° to 200°F. Cool the loaf on a wire cooling rack, and serve warm or at room temperature. Cut into quarters and slice each quarter with a sharp serrated knife. Delicious with butter.
h


Tuesday, October 20, 2009

Wedding Favors

So I'm getting married! Wow. I haven't written about this on my blog yet; sadly, I've been spending all of my blogging time on another site, the Off Beat Bride Tribe. I keep a running journal of wedding planning updates there, but the last update overlaps with this blog, so here you have it.


The only person who will truly know what I went through to create my wedding favors will be my BFF/maid of honor, and who I call my Top Chick, but for here will be referred to as M. I had 160 little jars shipped to her place because there's no room for them in my apartment in Brooklyn, and I drove myself, 75 hot peppers, and a food processor to her house this weekend to make my favors. We got up early to go to the green market near her house for 30 bell peppers (I didn't get them at home at my own green market on Saturday because I was afraid they wouldn't keep all week), ran some errands, and I got started chopping at around noon. I was committed to using local ingredients, so everything that went into these little buggers came from either my green market at Grand Army Plaza or her green market in Phoenixville, PA. I was going to use the peppers that are growing on my back balcony, but I didn't get a bumper crop this season, so I had to settle for someone else's.


I chopped half of the hot and bell peppers by hand so that the relish wouldn't be too mushy, and chopped up the other half in the food processor. I was chopping for FIVE STRAIGHT HOURS! Tomatillos go in the recipe, too, and I ran into a huge problem when the tomatillo skins got stuck in her garbage disposal unit. I had to fish around in there with my bare hands to clear it up, and even then, I had to use some Liquid Plummer. By 5:30, the relish was brining and my hands were burning like a &$((##@. I consulted an article on Chow about how to soothe burning hands after cutting chiles (Avoiding Chile Eyeball), and jumped in the car to buy some lemons, lemon juice, and yogurt.

You should have seen me at Target wheeling around a cart resting my hands on two frozen bags of edamame, and then in the parking lot pouring lemon juice over my hands.


It took me from about 8 pm until 11:30 to rinse the brine, drain the relish, wash the little jars, spoon in about 5 teaspoons into each jar, and then pour boiling hot vinegar syrup in each little jar. By the time Saturday Night Live came on, I was sitting on the floor with a glass of wine and each hand dunked into a big bowl of yogurt. Quite a sight (and very difficult to drink the wine). I was only able to do about 115--I ran out of relish. So I'll do the remaining 50 or so as sweet pepper relish this weekend. I don't think I can handle another batch of the hot anytime soon. I guess that answers my question about switching careers.

Sunday, June 28, 2009

Frisbee Kirbys

D has been playing frisbee since he was like 12 years old. He's been to both national and international championships multiple times. This summer, he joined a Grand Masters team--men over 40--in a tournament in Denver, Colorado. I wanted to do something special to support the new team. A few times, I've brought out big containers of cookies or brownies that they guys munched up after their last game. I wanted to do something healthier this time.

For the past few years, from the sidelines I've seen the guys chugging pickle juice from big jars of Vlasic pickles that they kept in coolers. Apparently, pickle juice helps with muscle cramping in athletes. I don't know if it's the vinegar, or a complex interaction of the ingredients, but I knew what I had to do. (info about the benefits of pickle juice in muscles here). So I made a big batch of kirby dills a few weeks before the tournament, and then packed them very carefully in a big plastic container, quadruple wrapped them, and put them in my checked luggage. I had a lot to think about before this trip--a lot of work stuff going on, things to do....but the safety and security of the pickles on the plane was really my biggest concern. They arrived safely with a very minimal amount of leakage and I brought them out during their second day of play. I think they liked them, though I regret not getting a picture of them digging in to the jar from the sidelines.

D's master's team made it to nationals in Sarasota, Florida this year, and I wanted to send him down with another batch of pickles. I bought about 24 persian cucumbers and socked them in ice water for two days, but then I found myself too busy to finish the picklemaking in time enough for me to be confident in their taste to send them down for the team. I cut them up, packed them in a big glass jar, and they stayed behind when D boarded the plane for Florida.


I wish I would have sent them because they were delicious, and they would have been fine after sitting for a few days in his hotel room. Oh well. Now we have a big old jar of pickles to eat ourselves!

Tuesday, March 17, 2009

Happy St. Pat's!

Next year, I vow to you, loyal reader, that I will make my own corned beef. I don't know what I was thinking. Fairway had piles of corned beef all sealed up in shrinkwrap, $6.29/lb. We opted for Fairway-made, old-fashioned, barrel brined corned beef, $6.99/lb. But it only takes 7 days to make your own. I just have to mark it on the calendar so I don't forget.

No matter, St. Patrick's day dinner was great. D brought home some soda bread (I wanted to forego the bread this year, but hey, it's yummy), and last night, I slow cooked the corned beef in my slow cooker (Guiness, water, beef, pickling spices, onion, carrot, and celery --> crock pot for 7 hours --> drain --> stick in fridge). When I got home from work this evening, I pre-heated the oven to 350, took the corned beef out of the fridge, and coated it with Dijon mustard. Then I mixed 1/2 cup of panko and 5 tbsp horseradish together and pressed the mixture over the mustard-covered beef. I placed the beef in a roasting pan and surrounded it with fingerling potatoes tossed with olive oil, salt, pepper, rosemary, and caraway seeds. After popping that in the oven, I sliced up the cabbage and stuck it in a soup pot with water (enough to cover it), caraway seeds, half a veggie bouillon cube, and salt and pepper and brought it to a boil. D snuck in a quartered onion. When the cabbage was tender, I turned off the heat and turned up the oven to 450 for about 15 minutes. When the panko topping was browned, I took it out of the oven. I let the beef rest for a bit and drained the cabbage. Sliced beef, boiled cabbage and onion, and roasted potatoes--a wholesome Irish meal.

Tuesday, January 27, 2009

Chicken Soup from a Chain Deli is SO BAD

I have a cold. A bad cold. It's the cold that everybody's getting, and of course, there's no time to take a sick day at work this week. Add to that that I've been too busy and too tired from being sick to cook much, and too scared to spend money on non-essentials given what's going on with the economy. But I broke down this afternoon and went out for a cup of soup at Pax deli in lower Manhattan. Seven dollars?! But that's not the worst part of it....the soup was TERRIBLE. I mean, really super terrible. It was so incredibly bland, the broth was almost like water.

Fortunately, I brined and roasted a small organic chicken on Sunday night, so tonite, so I decided to invest a small amount of time making my own damn chicken soup for tomorrow.

One good thing about being a refrigerator packrat is that you can always find something to make soup. I found two wilted carrots, some wilty celery, wilty parsley, and some brittle rosemary. I threw the brittle rosemary into a pot with enough water to cover the chicken carcass (we had already made two roasted chicken dinners and some salad with shredded chicken on top) and started a rolling boil. Then I sauted the chopped carrots, celery, a medium onion, and about six cloves of garlic that I chopped together with the wilty parsley and some thyme. Chopped those together so that the garlic absorbs the flavor of the herbs, and the herbs pick up a garlicky flavor. It's kind of like a mash when it's done, or like an herb paste. I sauteed those until they were nice and carmelized.

Once the broth was cooked down and clear, and the rest of the chicken was falling off the bone, I took a bowl and poured the entire chicken stock mixture through a strainer into the bowl. I put the broth from the bowl back into the soup pot and added the sauteed vegetables. I like to sort through the stuff that ends up in the strainer and pick the good pieces of meat out to throw back in the soup.

I'm tellin' you. This soup will definitely warm your heart, and help your immune system get itself back up and running.

Sunday, December 28, 2008

Yucatan Empanadas

My favorite Christmas present this year was a set of empanada makers from D's sister. I've been thinking about making empanadas since before Thanksgiving. Frozen ground turkey from an organic bird was just waiting in the freezer to get doctored up into some spicy turkey empanadas. I'd never made them before, so I kept putting it off, mostly because I am not usually graceful enough with dough. But I threw a bag of the frozen turkey meat in our cooler for the few days we were staying at our friends' country house in PA between Christmas and New Year. Just before we left, D's sister dropped off some presents, and the empanada makers were among them. I researched some recipes, packed together the ingredients, and off we went.
This is the recipe for the dough, and followed by a website that gives a step-by-step tutorial on how to make empanadas.

Cornmeal Whole Wheat Crust

1 cup flour
1 cup whole wheat flour
1 minus 2 tbsp cup yellow cornmeal
2 tbsp almonds
1 1/2 t baking powder
1 t salt
1/2 t nutmeg
6 whole coriander seeds
1/2 cup cold water (or more as necessary)
1 stick cold butter, cut into small pieces
1 egg, lightly beaten

Combine flours, cornmeal, baking powder, seasonings and salt in a blender or food processor; pulse just til combined.

Add water, butter, and egg; pulse just til combined, adding additional water if needed. Place the dough on a lightly floured surface; knead gently 4 to 5 times. Place in a bowl, cover and refrigerate 1 hour.

Preheat oven to 425°. Spray two large cookie sheets with cooking spray.

Divide dough into 12 equal pieces. Roll each piece into an approximately 6" circle on a lightly floured surface. Spoon 1/4 cup of filling into center of each circle.


This is what I did for the filling, but you could do so many things with empanadas....

1 lb ground turkey
1 medium onion, diced
3 cloves garlic
½ cup currants
1 cup chopped mushrooms
2 tbsp Yucatan spice mix
¼ tsp cayenne pepper
½ tsp salt

Bake at 400 degrees F for 10 minutes, then reduce heat to 350 and continue baking until the crust is browned.

Step-by-step instructions: http://latinfood.about.com/od/appetizersandsnacks/tp/empanadas.htm

And this is how we served it:

Monday, October 20, 2008

Maple-Roasted Chicken with Apple-Mushroom Wild Rice and Lentil Pilaf

The only things you should have to do on Sunday are: watch Meet the Press, read your favorite parts of the New York Times, go on a bike ride, and make a nice dinner. If those are the criteria for a perfect Sunday, I outdid myself and had a more perfect Sunday. Colin Powell started my morning by giving the most eloquent and poignant endorsement of Barack Obama, the Times had an awesome feature on Rachel Maddow, the park was at its fall best and my new bike was awesome (so was my partner, who encouraged me to keep going up those hills!), and the dinner we chose was soul-warming. On the way home from the park, we stopped by a Barack O'Bake Sale run by four neighborhood kids. Their enthusiasm was something else!

I got a free-range chicken at Fairway and brined it in water, kosher salt, a chopped up onion, and a sprig of rosemary. I left the chicken in the fridge in its brine for about 8 hours. When I took it out of the fridge, I rinsed it throughly, rubbed it with olive oil, and coated it with a spice mixture I got from a poultry-seller at the Grand Army Plaza Farmer's Market in Prospect Park. The spice mixture uses maple crystals as its base, so it was nice and sweet. We didn't do anything else to the chicken--just roasted it at 400 degrees for about an hour.

For the Apple-Mushroom Wild Rice and Lentil Pilaf, we didn't follow a recipe really. I got the idea from a fall recipe newsletter that advertised an Apple-Leek Stuffing. I couldn't find leeks anywhere this weekend, so I just used the apple part to inspire a nice side dish. In general, the pilaf was made this way:

Combine wild rice with a touch of olive oil in a small bowl. Sautee onion and garlic in a sauce pan. Once they are carmelized, add chopped mushrooms and celery. When they are soft, add the wild rice, chicken stock, and about 1/2 cup of lentils. Add salt and pepper and simmer, covered, for about 45 minutes. When the rice is nearly done, add chopped apples to the mixture. Uncover and continue to cook until the rice is tender and the water is absorbed.

The dish is even better for lunch the next day.

Monday, August 11, 2008

The Long, Hot Labors of Pepper Relish

This is the product of my labors on Saturday. Several jars of sweet pickles for a barbeque in San Francisco this coming weekend, several jars of Mexican Pepper Relish, and one experiment in gherkins that I am less than optimistic about.

I didn't keep perfect track of my recipe for the relish, but this is what I remember I did. In addition to the peppers I brought back from Mexico, I shopped at the Grand Army Plaza Farmer's Market for the tomatillos, bell peppers, and onions.

Mexican Hot Pepper Relish

10 hot peppers of various shapes, sizes and colors
2 green bell peppers
1 red bell pepper
1 large onion
5 medium-sized tomatillos
1 cup of sugar
2 cups of vinegar
2 cups of water
3/4 cup of canning salt

Cut the hot peppers with a sharp knife into tiny pieces. Your fingers will be burning, but its better than putting them through a processor...too much juice and you lose too much of the meat of the peppers. Put aside in a small bowl. I suggest putting half of the bell peppers, half of the onions, and all of the tomatillos in a little food chopper and handcutting the rest. Mix them all together in a bowl and sprinkle with 3/4 cup of canning salt. Stir up to ensure that the peppers are covered in the salt, and then cover with boiling water. Let stand for about 2 hours.

When the peppers are brined, rinse them lightly and then drain them (you can save the liquid). If you want, you can substitute some or all of the pepper liquid for the water to make the relish syrup.

Combine the water (or pepper juice), vinegar, and sugar and bring to a boil.

Spoon the pepper mixture into small jars, cover with boiling syrup, and seal the jars. They should be good after three days of setting.

Enjoy some on scrambled eggs, steak, hot dogs . . . and remember to share with your friends!

Saturday, August 9, 2008

I haven't decided on a name for my Mexican pepper relish


Two years ago, I called my first batch of relish hellfire hot pepper relish. My friend Patrick grew scotch bonnets and gave me a few, and I made 12 jars of relish. Last year, my own peppers were either not hot enough, or I added too many other ingredients, so the relish was awesome, but it wasn't very hot.

This year, I've been growing my own peppers--Carribean Reds and Jalapenos--but I also brought these peppers back from Mexico and made a few jars this afternoon. I'll post the recipe soon (its kind of complicated), but for now, I'll just say that my fingers are still burning.

Friday, December 15, 2006

"I never get tired of turkey"

That's what my mother used to say after Thanksgiving.....and twelve nights of croquettes, soup, sandwiches, etc. etc. etc. Well, I did get tired of turkey, so I threw all of our leftovers in the freezer and wondered if I'd ever have the stomach for them again. I knew it would be a late night, so I took out the leftover breast from Thanksgiving yesterday morning to eat last night for dinner. All I can say is I will never NOT brine poultry. I could not believe how moist it was! A few slices with some toasted pita, babaganoush, and olives made for a light tasty dinner.

Now....onto the subject that really matters: pickles! Friends keep sending me recipes and websites of homemade pickle sellers. One company had even SOLD OUT of their pickles for the holidays! So is there or isn't there room in the market for a novice start-up pickle maker with a lot of passion? I've got about 6 recipes I've made so far, and ideas and recipes from friends that will give me 6 more--a dozen products in my catalogue! Well, we'll see how the Christmas pickling goes, and maybe I'll ask all of my recipients to post their comments to this site. Tomorrow D. and I have promised one another we will get up super early and get to Grand Army Plaza for the Farmers' Market to see what kinds of great pickling produce we can score. Wish me luck!